Banana Pudding Poke Cake: The Ultimate Dessert Experience
When it comes to crowd-pleasing desserts, few things can beat the classic flavors of banana pudding. But what if we took those beloved flavors and transformed them into a moist, decadent, and incredibly easy-to-make cake? Enter the Banana Pudding Poke Cake. This dessert is a game-changer, combining the best elements of a traditional banana pudding with the comforting texture of a freshly baked cake. In this comprehensive guide, we’ll dive deep into everything you need to know about making the perfect Banana Pudding Poke Cake, from selecting the right ingredients to mastering the technique, and even some fun variations to try.
What is a Poke Cake?
Before we get into the specifics of the banana pudding flavor, let’s talk about the magic of the poke cake. Originating in the 1970s, poke cakes were a clever way to add moisture and flavor to standard box cake mixes. The concept is simple but brilliant: bake a cake, poke holes all over the top while it’s still warm, and pour a liquid or pudding mixture over the top. The liquid seeps into the holes, creating a cake that is exceptionally moist and bursting with flavor in every bite.
Over the years, poke cakes have evolved to include a wide variety of flavors, from classic Jell-O poke cakes to rich chocolate and caramel creations. The Banana Pudding Poke Cake is a relatively modern twist, marrying the retro charm of a poke cake with the nostalgic comfort of Southern banana pudding.
Why You’ll Love This Recipe
There are countless reasons why this Banana Pudding Poke Cake will quickly become a favorite in your household:
- Incredibly Easy to Make: This recipe relies on a few convenient shortcuts, like boxed cake mix and instant pudding, making it accessible even for novice bakers.
- Moist and Flavorful: The pudding soaks into the cake, ensuring that it is never dry. Every single bite is infused with the sweet, creamy flavor of banana pudding.
- Perfect for Crowds: This cake is baked in a 9×13 inch pan, making it ideal for potlucks, family gatherings, barbecues, and holidays. It slices beautifully and serves a large group.
- Make-Ahead Friendly: Poke cakes actually taste better after they’ve had time to chill in the refrigerator. This makes it the perfect dessert to prepare a day in advance, saving you time on the day of your event.
- Nostalgic Appeal: The combination of bananas, vanilla pudding, and vanilla wafers evokes fond memories of childhood desserts and family reunions.
Essential Ingredients for Banana Pudding Poke Cake
To create this masterpiece, you’ll need a handful of simple ingredients. Here’s a breakdown of what you need and why it’s important:
For the Cake Base
- Yellow Cake Mix: The foundation of our poke cake. A standard yellow cake mix provides the perfect flavor profile to complement the banana pudding. You can also use a white or vanilla cake mix if you prefer.
- Ingredients to Prepare the Cake Mix: Typically, this includes water, vegetable oil, and eggs. Follow the instructions on the back of the box for the best results. For a richer cake, you can substitute milk for the water or melted butter for the oil.
For the Pudding Filling
- Instant Banana Cream Pudding Mix: This is the star of the show. You’ll need two standard-sized boxes (usually around 3.4 oz each). Make sure you buy instant pudding, not the cook-and-serve variety. If you can’t find banana cream, vanilla pudding will also work, though the banana flavor won’t be as pronounced.
- Cold Milk: You need cold milk to activate the instant pudding. Whole milk will give you the creamiest texture, but 2% will also work fine.
For the Topping and Garnish
- Frozen Whipped Topping (e.g., Cool Whip): Thawed whipped topping creates a light, airy frosting that balances the richness of the pudding and cake. You’ll need an 8 oz tub. If you prefer, you can make homemade whipped cream by beating heavy cream with a little powdered sugar and vanilla extract until stiff peaks form.
- Vanilla Wafers (Nilla Wafers): These are essential for that classic banana pudding crunch and flavor. You’ll need them crushed for sprinkling on top, and you can also use whole ones for decoration.
- Fresh Bananas: Sliced fresh bananas are a must. They add natural sweetness and texture. However, because bananas brown quickly, it’s best to add them right before serving.
Step-by-Step Instructions: How to Make Banana Pudding Poke Cake
Now that we have our ingredients, let’s walk through the process of making this delightful dessert.
Step 1: Bake the Cake
Start by preheating your oven according to the directions on your cake mix box (usually 350°F or 175°C). Grease a 9×13 inch baking dish with non-stick cooking spray.
In a large mixing bowl, combine the yellow cake mix, water (or milk), oil (or melted butter), and eggs. Beat the mixture with an electric hand mixer on medium speed for about two minutes, scraping down the sides of the bowl as needed. The batter should be smooth and well combined.
Pour the batter into your prepared baking dish and smooth the top with a spatula. Bake in the preheated oven for the amount of time specified on the box, typically around 25-30 minutes. To check for doneness, insert a toothpick into the center of the cake; if it comes out clean, the cake is ready.
Step 2: Poke the Holes
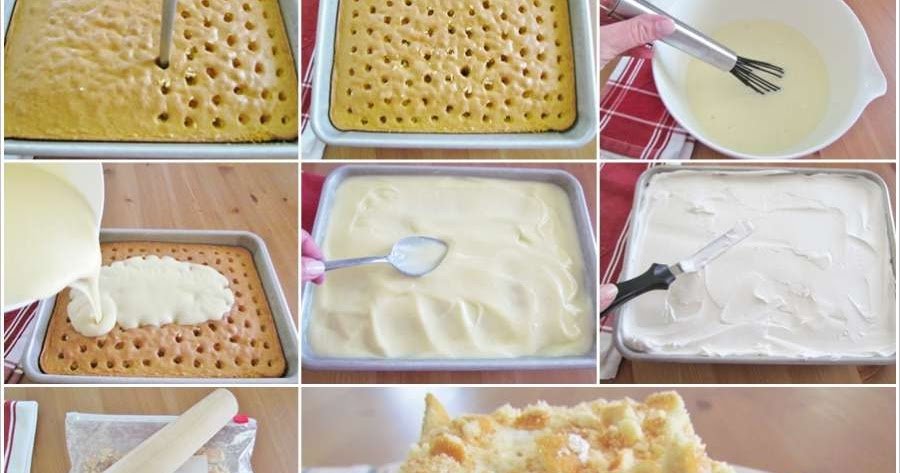
This is the fun part! Once the cake is out of the oven, let it cool for just a few minutes—it should still be warm. Using the handle of a wooden spoon, a chopstick, or a thick skewer, poke holes all over the surface of the cake. Space the holes about an inch apart, and poke them about halfway down into the cake (be careful not to poke all the way to the bottom of the pan). The holes need to be large enough for the pudding to seep in.
Step 3: Prepare the Pudding Mixture
In a medium mixing bowl, whisk together the two boxes of instant banana cream pudding mix and the cold milk. Whisk continuously for about two minutes until the mixture begins to thicken. It’s important to act quickly in the next step before the pudding sets completely.
Step 4: Pour and Spread
Immediately pour the slightly thickened pudding mixture evenly over the warm, poked cake. Use a rubber spatula to spread the pudding, gently pushing it down into the holes. Make sure the entire surface of the cake is covered.
Step 5: Chill the Cake
This step is crucial. Place the cake in the refrigerator and let it chill for at least two hours, or preferably overnight. The chilling process allows the pudding to fully set and the cake to absorb all that wonderful moisture and flavor.
Step 6: Frost and Garnish
Once the cake has chilled and the pudding is set, it’s time to add the finishing touches. Spread the thawed whipped topping evenly over the pudding layer.
Crush about half a box of vanilla wafers. You can do this by placing them in a zip-top bag and crushing them with a rolling pin, or by pulsing them a few times in a food processor. Sprinkle the crushed wafers generously over the whipped topping.
Right before you are ready to serve, slice the fresh bananas and arrange them on top of the cake. You can also add some whole vanilla wafers for extra decoration.
Tips for Success and Variations
While this recipe is straightforward, a few tips can help ensure your Banana Pudding Poke Cake is absolutely perfect:
- Don’t over-bake the cake: An over-baked cake will be dry and won’t absorb the pudding as well. Check the cake a few minutes before the suggested baking time.
- Poke the holes while the cake is warm: This is key. The warm cake absorbs the liquid much better than a cold cake.
- Preventing Brown Bananas: If you need to slice the bananas ahead of time, toss them gently in a little bit of lemon juice or pineapple juice. The acid will help prevent them from oxidizing and turning brown.
- Homemade Whipped Cream: If you prefer to avoid store-bought whipped topping, make your own! Whip 1.5 cups of heavy whipping cream with 1/4 cup of powdered sugar and 1 teaspoon of vanilla extract until stiff peaks form.
- Add Caramel: For a decadent twist, drizzle caramel sauce over the cake before adding the whipped topping, or drizzle it over the finished cake.
- Chocolate Banana Variation: Use a chocolate cake mix instead of yellow for a chocolate-banana flavor profile. You can even sprinkle mini chocolate chips on top along with the crushed wafers.
Storing Your Poke Cake
Banana Pudding Poke Cake is a wonderful make-ahead dessert because it actually gets better as it sits.
- Refrigeration: Store the cake in the refrigerator, covered tightly with plastic wrap or aluminum foil. It will keep well for up to 3-4 days. Note that the vanilla wafers on top will soften over time, and the bananas will eventually start to brown, which is why it’s best to add them right before serving.
- Freezing: Poke cakes generally don’t freeze well. The texture of the pudding and the whipped topping can become watery and grainy when thawed. It’s best to enjoy this cake fresh from the fridge.
The History of Banana Pudding
To truly appreciate this cake, it’s worth taking a brief look at the history of its inspiration: Southern banana pudding. The dish we know and love today has its roots in the late 19th century. English trifles, which layered sponge cake, custard, and fruit, were popular in America. As bananas became more widely available and affordable in the United States, they naturally found their way into these layered desserts.
The turning point for banana pudding came with the invention of the vanilla wafer. In 1898, the National Biscuit Company (Nabisco) introduced the Nilla Wafer. Soon after, recipes began appearing that swapped out the sponge cake for these convenient, crispy cookies. By the mid-20th century, banana pudding layered with Nilla Wafers, vanilla custard, and meringue or whipped cream was a staple of Southern cuisine.
The Banana Pudding Poke Cake is a wonderful evolution of this historic dessert. It takes the familiar flavors and textures and presents them in a format that is incredibly easy to prepare and perfect for sharing.
Conclusion
The Banana Pudding Poke Cake is more than just a dessert; it’s a comforting, crowd-pleasing experience that combines the best of baking ingenuity with classic flavors. Whether you’re hosting a summer barbecue, attending a holiday potluck, or simply craving a sweet treat on a Sunday afternoon, this cake is guaranteed to be a hit. Its moist texture, rich pudding filling, and the nostalgic crunch of vanilla wafers make every bite a delight. So, preheat your oven, grab your favorite mixing bowl, and get ready to create a dessert that will have everyone asking for the recipe. Enjoy the baking process, and most importantly, enjoy the delicious results!