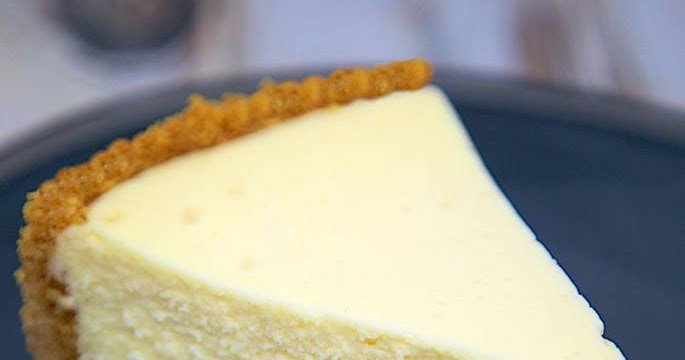
The Best Homemade Cheesecake: A Comprehensive Masterclass
There are few desserts as universally adored, yet as intimidating to bake, as a classic New York-style cheesecake. The perfect cheesecake is a study in contrasts: it should be incredibly rich and dense, yet possess a texture so smooth and creamy that it seemingly melts on the tongue. The crust should be buttery and crisp, providing the perfect textural foil to the luscious filling. Achieving this balance often seems like a feat reserved for professional pastry chefs or famous bakeries.
However, the truth is that baking the ultimate homemade cheesecake is entirely achievable in your own kitchen. It requires no special equipment—just a reliable recipe, an understanding of the science behind the bake, and a healthy dose of patience. In this comprehensive guide, we will walk you through every step, every ingredient, and every crucial technique required to create “The Best Homemade Cheesecake” you have ever tasted.
The Foundation: Understanding the Ingredients
A classic cheesecake relies on a very short list of ingredients. Because the list is so brief, the quality of those ingredients—and how you handle them—is paramount.
The Cream Cheese (The Star of the Show)
The most critical rule of cheesecake baking is this: use full-fat, brick-style cream cheese. Do not use whipped cream cheese, do not use a low-fat or non-fat “Neufchâtel” substitute, and do not use cream cheese from a tub. Brick-style cream cheese has the necessary fat content and structural integrity to create the dense, creamy texture we are aiming for. Tub cream cheese is aerated, which will introduce unwanted air into your batter and lead to cracking.
Crucial Step: The cream cheese must be entirely at room temperature before you begin mixing. If it is even slightly cold, it will remain lumpy, and no amount of mixing will smooth it out without incorporating too much air.
The Sugar
Granulated white sugar is standard for classic cheesecakes. It provides sweetness without adding extra moisture or altering the color.
The Eggs
Eggs are the binding agent. They give the cheesecake its structure and help it set. Like the cream cheese, the eggs must be at room temperature. Cold eggs added to room temperature cream cheese can cause the fat to coagulate, resulting in a lumpy batter.
The Sour Cream or Heavy Cream
This recipe utilizes sour cream. Sour cream adds a slight tang that cuts through the richness of the cream cheese, and its acidity tenderizes the proteins in the eggs and cheese, ensuring a softer, creamier texture. Heavy cream can be used for a slightly denser, richer cake without the tang.
The Flavorings
Pure vanilla extract is essential. For a brighter flavor profile, a small amount of fresh lemon juice or lemon zest can elevate the entire dessert, cutting the heaviness without making it taste distinctly like a “lemon cheesecake.”
The Crust
The classic foundation is a graham cracker crust. It requires graham cracker crumbs, granulated sugar, and melted unsalted butter. You can buy pre-crushed crumbs, or crush whole crackers in a food processor.
The Crust: Building the Base
A great cheesecake needs a sturdy, flavorful base.
- Preparation: Preheat your oven to 350°F (175°C).
- The Pan: You must use a springform pan—typically a 9-inch pan. A springform pan allows you to release the sides, leaving the delicate cake intact on the base.
- Mixing: In a medium bowl, combine 2 cups of graham cracker crumbs, 1/3 cup of granulated sugar, and 1/2 cup (1 stick) of melted unsalted butter. Stir until the mixture resembles coarse, wet sand.
- Pressing: Transfer the mixture to the springform pan. Use the bottom of a measuring cup or a flat glass to press the crumbs firmly into the bottom and slightly up the sides of the pan. A tightly packed crust is less likely to crumble when sliced.
- Pre-baking: Bake the crust for 10 minutes. This pre-baking step sets the crust, ensuring it remains crisp under the wet filling. Let it cool completely while you prepare the filling.
The Filling: The Art of Mixing
The goal when mixing cheesecake batter is to create a perfectly smooth, homogenous mixture without incorporating air. Air bubbles in the batter will expand during baking and collapse during cooling, causing the dreaded cracks on the surface.
- Beat the Cream Cheese: Place 32 ounces (four 8-oz blocks) of room temperature cream cheese in the bowl of a stand mixer fitted with the paddle attachment (or use a large bowl and a hand mixer). Beat on medium speed for about 2 minutes until completely smooth and creamy. Scrape down the sides and bottom of the bowl thoroughly.
- Add Sugar and Cornstarch: Add 1 cup of granulated sugar and 1 tablespoon of cornstarch (or flour). The cornstarch acts as an insurance policy; it stabilizes the eggs and helps prevent the cake from cracking. Beat on low speed just until combined. Scrape the bowl again.
- Add Flavorings: Mix in 3/4 cup of room temperature sour cream, 1 tablespoon of pure vanilla extract, and (optional) 1 teaspoon of fresh lemon juice. Mix on low speed until smooth.
- Add the Eggs—One at a Time: This is crucial. With the mixer on the lowest possible speed, add the 4 room-temperature large eggs one at a time. Wait until each egg is just barely incorporated before adding the next. Stop mixing the second the last egg is blended. Do not overmix.
- Final Tap: Pour the batter over the cooled crust. Smooth the top with a spatula. Gently tap the pan on the counter a few times to force any trapped air bubbles to the surface. You can pop these bubbles with a toothpick.
The Water Bath (Bain-Marie): The Secret to Perfection
This is the step most people want to skip, but it is the absolute secret to a perfect, crack-free, creamy cheesecake. A water bath (bain-marie) does two things:
1. It creates a humid environment in the oven, preventing the surface of the cake from drying out and cracking.
2. It insulates the pan, ensuring the cheesecake bakes slowly and gently at an even temperature, preventing the edges from overcooking before the center is set.
How to Prepare the Water Bath:
Since springform pans are notoriously prone to leaking, you must waterproof your pan.
1. Lay out two large, heavy-duty sheets of aluminum foil in a cross shape. Place the springform pan in the center and tightly fold the foil up the sides. For extra insurance, you can place the foil-wrapped pan inside a slightly larger cake pan or use a slow cooker liner.
2. Place the wrapped springform pan into a large roasting pan.
3. Boil a kettle of water. Carefully pour the boiling water into the roasting pan until it reaches about halfway up the sides of the springform pan.
The Bake and The Cool Down
Baking a cheesecake is an exercise in patience.
- Baking: Place the roasting pan carefully into a preheated 325°F (160°C) oven. Bake for 60 to 75 minutes.
- The Jiggle Test: Do not overbake! The edges should be set and slightly puffed, but the center 2-3 inches should still jiggle slightly when you gently shake the pan. It will continue to cook and set as it cools. If the center is completely firm, it is overbaked and may crack or have a dry texture.
- The Oven Cooling Method: Turn the oven off completely. Leave the cheesecake in the oven and crack the oven door open slightly (you can prop it open with a wooden spoon). Let the cheesecake cool in the oven for 1 hour. This gradual cooling prevents drastic temperature changes that cause cracking.
- Counter Cooling: Remove the pan from the water bath and take off the foil. Place the pan on a wire rack and let it cool completely to room temperature. This can take 2-3 hours.
- The Chill: Once completely cool, cover the pan with plastic wrap and place it in the refrigerator. The cheesecake must chill for a minimum of 6 hours, but preferably overnight (12-24 hours). This chilling period is when the texture fully sets and the flavors meld.
Slicing and Serving Like a Pro
After all that patience, you want to serve beautiful, clean slices.
- Release the Springform: Run a thin, hot knife around the very edge of the cake to loosen it from the pan before releasing the springform latch.
- The Hot Knife Method: To get clean slices, fill a tall glass or pitcher with hot tap water. Dip a sharp chef’s knife into the hot water, wipe it completely dry with a towel, and make one clean slice. Repeat this process—dip, wipe, slice—for every single cut.
Variations and Toppings
While a plain New York cheesecake is perfect on its own, it also serves as a wonderful canvas for toppings.
- Fruit Compote: A simple strawberry, cherry, or blueberry sauce made by simmering the fruit with a little sugar and lemon juice is a classic pairing.
- Caramel and Pecans: Drizzle homemade or high-quality store-bought caramel sauce over the top and sprinkle with toasted pecans.
- Chocolate Ganache: A rich layer of chocolate ganache spread over the chilled cake turns it into a decadent tuxedo cheesecake.
Conclusion
Baking the perfect homemade cheesecake is a labor of love, but it is a process that rewards patience and attention to detail. By using room-temperature, high-quality ingredients, employing a gentle mixing technique, and utilizing a water bath and slow cooling process, you can achieve professional-level results in your own home. The reward—a flawlessly smooth, rich, and utterly delicious cheesecake—is well worth the effort.