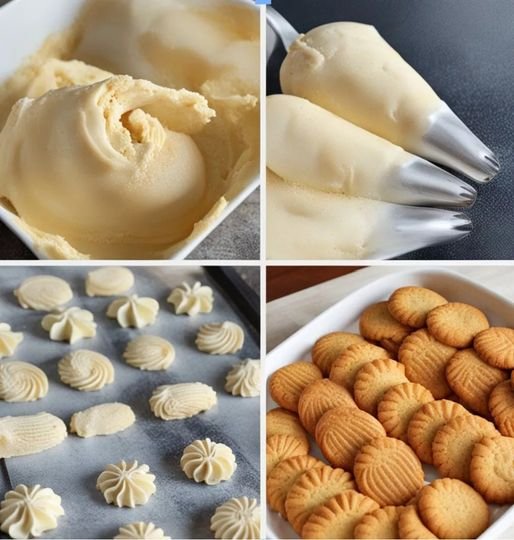
Butter piped cookies are crisp at the edges, tender in the middle, and shaped with a piping bag before baking. This version uses a short list of pantry staples: softened butter, sugar, egg, vanilla, flour, baking powder, and salt. The dough is mixed, piped into small shapes, and baked until the edges are lightly golden.
Ingredients
- 1 cup unsalted butter, softened
- 1 cup granulated sugar
- 1 large egg
- 1 teaspoon vanilla extract
- 3 cups all-purpose flour
- 1 teaspoon baking powder
- A pinch of salt
How to make butter piped cookies
- Prepare the oven and pans. Heat the oven to 350°F (180°C). Line two baking sheets with parchment paper.
- Cream the butter and sugar. Beat the softened butter and granulated sugar until the mixture looks lighter and fluffy. Scrape the bowl so the mixture is even.
- Add the egg and vanilla. Beat in the egg and vanilla until combined. If the mixture looks slightly separated, continue mixing briefly and scrape down the bowl.
- Combine the dry ingredients. In a second bowl, whisk together the flour, baking powder, and salt. Add the dry mixture gradually, mixing just until a soft dough forms.
- Pipe the cookies. Fit a piping bag with a star tip and add the dough. Pipe small rounds or short rosettes onto the prepared pans, leaving about an inch between cookies. If the dough is difficult to pipe, pause and let it soften slightly; do not add extra liquid.
- Bake and cool. Bake for 10–12 minutes, checking near the end. Remove the cookies when their edges are lightly golden. Let them sit on the pan for a few minutes, then transfer carefully to a rack to cool completely.
Tips for neat piped shapes
Use butter that is softened but not melted. Very cold butter makes a stiff dough, while melted butter can make piped shapes spread. Add flour gradually and stop mixing as soon as it is incorporated so the cookies stay tender.
Hold the piping bag close to the sheet and apply steady pressure. Keep the shapes similar in size so they bake at about the same rate. If the dough feels too firm for the piping tip, let it rest at room temperature for a few minutes and try again. If piping still feels awkward, use a spoon to portion small mounds and flatten them gently with a fork, as the original method suggests.
Decorating ideas
These cookies can be served plain or decorated after they have cooled. Try a light drizzle of melted chocolate, a small amount of frosting, or a few sprinkles. Keep decorations simple so the buttery flavor remains the focus. Wait until the cookies are fully cool before adding any topping that could melt.
Storage
Once cool, store the cookies in an airtight container in a cool, dry place. Separate decorated layers with parchment if the toppings are delicate. For the best texture, avoid sealing the cookies while they are still warm, because trapped steam can soften them.
Frequently asked questions
Can I make the dough without a piping bag?
Yes. Use a spoon to make small portions and flatten them lightly with a fork. The cookies will look different, but the same dough can be baked this way.
Why is the dough hard to pipe?
The butter may be too cold, or the dough may be too firm for the piping tip. Let it stand briefly at room temperature and try again. Avoid adding liquid unless the recipe has been tested with that change.
How do I know when the cookies are done?
Begin checking at 10 minutes. The original method calls for baking 10–12 minutes, until the edges are lightly golden. Oven performance and cookie size can affect the timing, so watch the first tray closely.
Can I decorate the cookies before baking?
This version decorates the cookies after baking. If you want to add sugar or other toppings beforehand, test a small batch first because toppings can change how the surface looks or bakes.
Recipe source: This post preserves the ingredient quantities and baking method previously published here. The earlier page credited Hopemakers Online. Confirm permission and kitchen-test the recipe before describing it as tested by THISIZMARY.