Exploring these adorable yet practical short hairstyles is definitely a fantastic idea.
Gone are the days when long, flowing hair was the sole focus of attention. Nowadays, short hair is the trendsetter. This holds particularly true for black women, thanks to the beautiful coiled texture of their hair. Short hairstyles not only offer convenience in terms of washing, drying, and styling, but they also save a considerable amount of time. Contrary to the misconception that short hair limits styling options, numerous celebrities and hairstylists are embracing stunning short hairdos in movies and on social media platforms. The truth is, you can unleash your creativity and style short hair just as imaginatively as long hair. In this article, we present our top picks for short hairstyles that black women can confidently choose from. Select one and give it a try!
[the_ad_group id=”3″]
Before diving in, here’s a pro tip:
To maintain the health of your short hair and prevent dryness and breakage, it’s advisable to condition it once a week and indulge in a hot oil treatment twice a month.
Avoid tightly pulling your short hair into braids, as it can weaken the roots and lead to hair fall.
Furthermore, it’s best to refrain from wearing high ponytail styles for extended periods, as they can contribute to hair loss.
Regal Afro with a Crowned Braid
[the_ad_group id=”4″]
- If you’re fortunate enough to possess a majestic afro, why not utilize it to take your hairstyle to the next level? The crowned braid on an afro is an elegant choice that requires just a few minutes to achieve perfection. To enhance this look even further, consider adding a sunny yellow hue to your ‘fro.
Here’s what you’ll need:
- Rat-tail comb
- Hair pick
- Hair elastic
- Bobby pins
- Hair cream
How to Style:
- Start by using a hair pick to gently fluff out your afro, giving it a voluminous appearance.
- With a rat-tail comb, create a horizontal parting that separates the hair on the crown from the hair at the back.
- Apply a small amount of hair cream to the front section of your hair to add some hold and smoothness.
- Begin Dutch braiding your hair from the left side, moving towards the right.
- Continue braiding until you reach behind your right ear, and then secure the braid with a hair elastic and a few bobby pins.
[the_ad_group id=”1″]
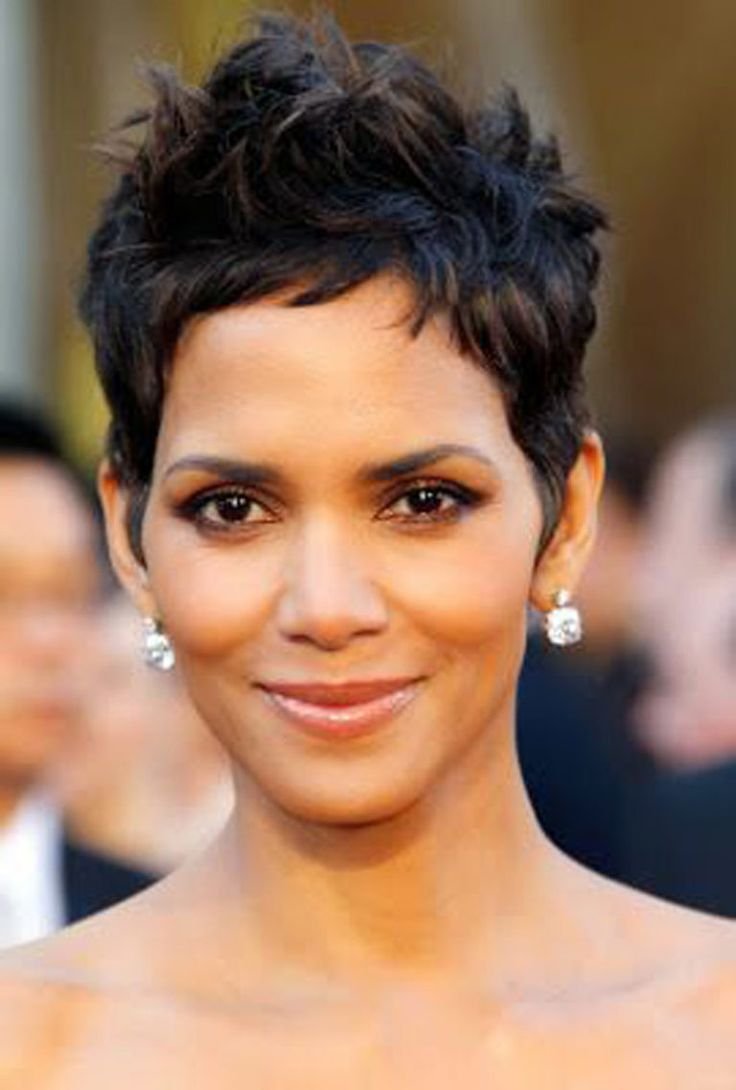
2 Pixie With Bangs
A pixie haircut with bangs offers a versatile and feminine look that is perfect for any occasion. It has the ability to refresh your appearance like no other hairstyle. If you’ve been inspired by Rihanna’s iconic short hair, starting with a pixie cut with bangs is a fantastic choice. Creating face-framing bangs on a pixie is a breeze, simply by sweeping the bangs forward from the crown.
Here’s what you’ll need:
- Hair brush
- Blowdryer
- Small round brush
- Heat protectant
- Straightening iron
- Setting spray
How to Style:
- Start by brushing your hair thoroughly to remove any knots or tangles.
- Blowdry your bangs, using a brush to direct them in the desired parting.
- Apply a heat protectant to shield your hair from heat damage, then use a straightening iron to straighten your bangs, ensuring a sleek and polished finish.
- Use your fingers to separate the face-framing sections of your bangs, creating a soft and natural appearance.
- To set the style in place, mist a setting spray all over your pixie haircut, ensuring long-lasting hold and a beautiful finish.
[the_ad_group id=”2″]
3. Classic Tight Mohawk
The mohawk hairstyle is no longer limited to men, as it has experienced a significant surge in popularity among women in recent years. It has become one of the go-to hairstyles for the summer season, offering relief from the discomfort of sweaty and hot hair on the neck.
Here’s what you’ll need:
- Wide-toothed comb
- Blowdryer
- Hair brush
- Heat protectant
- Straightening iron
- Strong-hold hair gel
How to Style:
- Start by washing your hair and use a wide-toothed comb to gently detangle it, ensuring it’s free from any knots.
- While blowdrying your hair, use a hair brush to brush it down, aiming to straighten it as much as possible.
- Once your hair is completely dry, apply a heat protectant to safeguard it from heat damage, and then use a straightening iron to achieve a sleek and straight appearance.
- Apply a strong-hold hair gel to your hair and use your hands to style your mohawk according to your preference. Get creative and experiment with different variations to find the perfect look for you.
[the_ad_group id=”3″]
4 Straight Frohawk
If you have a square-shaped face and are open to taking fashion risks, this hairstyle is perfect for you. Willow Smith has confidently showcased how a straight frohawk can make a bold style statement at any event.
Here’s what you’ll need:
- Hair brush
- Blowdryer
- Heat protectant
- Straightening iron
- Hair pomade
- Setting spray
How to Style:
- Start by washing your hair and use a hair brush to remove any knots and tangles.
- While blowdrying your hair, brush it upward to create volume and height.
- Apply a heat protectant to shield your hair from heat damage, and then use a straightening iron to straighten your hair strands for a sleek look.
- Take some hair pomade and use your hands to make your hair stand on its ends, creating a frohawk style. Play around with the positioning and height to achieve the desired effect.
- Finally, apply a setting spray to hold the style in place throughout the day, ensuring your frohawk stays fierce and fabulous.
[the_ad_group id=”4″]
5. Classic Finger Waves
From the 1920s to the 2020s, finger waves continue to make a statement in the world of hairstyles and red carpet events. Whether you’re aiming for a retro-inspired look or a modern twist, finger waves offer endless versatility. With just your fingers and a high-quality hair gel, you can effortlessly create these chic and timeless waves.
Here’s what you’ll need:
- Rat-tail comb
- Blowdryer
- Hair mousse
- Hair gel
- Hooded hair dryer
- Setting spray
How to Style:
- Begin by washing your hair and blowdrying it while brushing it down to ensure a smooth and sleek foundation.
- Apply a hair mousse all over your hair to encourage it to lay flat against your scalp, providing a solid base for the finger waves.
- Next, generously apply hair gel throughout your hair, ensuring each strand is coated for optimal hold and definition.
- Using your fingers and a rat-tail comb, create multiple small S-shaped waves along your hair, working from the roots to the ends.
- Set the waves in place by sitting under a hooded hair dryer or using a diffuser attachment on your blowdryer to gently dry your hair.
- Finally, finish off the look by spritzing a setting spray all over your hair, ensuring the finger waves stay intact and beautiful for an extended period.
[the_ad_group id=”1″]
6. Micro Braids With Bangs
To rock a stylish and distinctive look, you can embrace micro braids with bangs. There are two options to consider: letting the braids flow freely or securing some of them with pins or barrettes for added versatility.
Here’s what you’ll need:
- Hair wax
- Fine-toothed comb
How to Style:
- Begin by visiting a professional to have your hair and bangs cut short and braided into micro beads. Their expertise will ensure a precise and polished result.
- After the braiding process, apply a small amount of hair wax to your edges. This will help to smooth and hold them in place.
- Using a fine-toothed comb, carefully lay your edges against your forehead, creating a sleek and neat appearance.
Now you can confidently rock the chic and unique combination of micro braids and bangs. Feel free to experiment with different styles by either wearing the braids down or pinning them up for a varied and personalized look.
[the_ad_group id=”4″]
7. Half Side Cornrows
Cornrows are a versatile hairstyle that suits people of all ages. You can unleash your creativity by experimenting with various cornrow patterns to create a personalized look. One popular design involves incorporating cornrows on one side while leaving loose hair on the other side.
Here’s what you’ll need:
- Leave-in conditioner
- Moisturizing cream
- Hair pick
How to Style:
- Start by visiting a professional to have the hair on one side of your head braided into cornrows. Their expertise will ensure neat and well-executed cornrows.
- Prior to styling, wash your hair and apply leave-in conditioner and moisturizing cream to keep it hydrated and manageable.
- Divide the loose hair into small sections and twist each section tightly. Leave the twists in place overnight to set.
- The next morning, carefully unravel the twists, allowing your hair to form natural curls.
- To enhance the volume and definition of your curls, use a hair pick to gently fluff them out.
By combining cornrows with loose curls, you can achieve a stylish and eye-catching hairstyle that reflects your individuality.
[the_ad_group id=”3″]
8. Cornrow Crown
If you want to exude a princess-like aura, a cornrow crown hairstyle will make you look and feel like royalty. Embrace this adorable and regal look to stand out in a crowd and embrace the queen that you are. While diamond crowns are undoubtedly stunning, there’s something truly special about a queen with a natural hair crown.
Here’s what you’ll need:
- Hair tie
- Hair pomade
- Fine-toothed comb
How to Style:
- Begin by visiting a professional to have your hair braided into cornrows. Ask them to part your hair down the middle and direct the cornrows from the front to the back.
- Gather all the braided ends of the cornrows and tie them together in a low bun or ponytail. This will create a pulled-back cornrow arrangement that resembles a crown at the front of your head.
- To refine the look, use a small amount of hair pomade and a fine-toothed comb to lay down your edges, ensuring a sleek and polished appearance.
By embracing the cornrow crown hairstyle, you’ll radiate a princess-like charm that showcases your regal nature. Embrace your natural hair and let it adorn you like the crown you deserve.
[the_ad_group id=”2″]
9. Beaded Bob
If you’re looking to make a transformative statement with your hairstyle, consider getting your braids done in a unique color. One adorable and eye-catching option is ginger micro braids styled in a bob with curly ends. To add an extra touch of charm, accessorize your braids with colorful beads that match your outfits!
Here’s what you’ll need:
- Colorful hair beads
- Hair pomade
- Fine-toothed comb
How to Style:
- Start by visiting a professional to have your hair braided into short micro braids. Their expertise will ensure precise and well-executed braids that serve as the foundation for the style.
- Clip colorful hair beads onto your braids, choosing colors that complement your outfit or reflect your mood. Be creative and experiment with different combinations for a personalized touch.
- To complete the look, apply a small amount of hair pomade to your edges and use a fine-toothed comb to gently lay them down, creating a sleek and polished appearance.
By opting for ginger-colored micro braids and adding colorful beads, you’ll achieve a unique and adorable hairstyle that truly stands out. Embrace the versatility of your braids and have fun accessorizing them to express your personal style.
[the_ad_group id=”1″]
10. Pulled-Back Afro
If you want to make the most of your afro hair in a simple and elegant way, take inspiration from the stylish actress Issa Rae. With this pulled-back afro style, you can transform a bad hair day into your best hair day in just a few minutes!
Here’s what you’ll need:
- Hair brush
- Hair gel
- Small-toothed comb
- Hair spray
- Afro hair tie
How to Style:
- Begin by applying hair gel to the top half of your hair. Use a brush to slick it back, making sure it lays smoothly and flat against your head.
- Next, gather your entire afro at the back of your head. Place an afro hair tie around it and pull it back until it feels secure.
- Tie the hair tie at the nape of your neck, ensuring that the afro is held neatly in place.
- To add a sleek and polished touch, use hair gel to smooth down the crown and edges of your hair, giving them a shiny and glossy appearance.
- Lastly, spritz on some hair spray to set the style and keep it in place throughout the day.