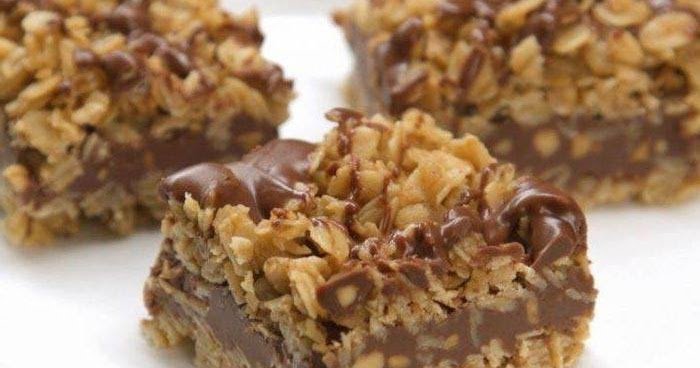
Easy No-Bake Chocolate Oat Bars: The Ultimate Healthy Treat
In today’s fast-paced world, finding a snack that is simultaneously healthy, satisfying, and easy to make can feel like searching for a needle in a haystack. Enter the Easy No-Bake Chocolate Oat Bars. These incredible bars are a lifesaver for busy professionals, parents on the go, and anyone with a sweet tooth looking for a guilt-free indulgence. In this comprehensive guide, we will explore why these bars are the perfect addition to your meal prep routine, break down the nutritional benefits of the ingredients, and provide a foolproof recipe that you can whip up in minutes.
Why We Love No-Bake Recipes
Baking is a science that requires precision, time, and, often, a lot of cleanup. No-bake recipes, on the other hand, are the rebels of the culinary world. They offer instant gratification with minimal effort.
The Benefits of Going No-Bake
- Speed: Without the need to preheat an oven or wait for baking times, you can have a batch of these bars prepared and setting in the fridge in under 15 minutes.
- Energy Efficiency: Especially during the hot summer months, keeping the oven off keeps your kitchen cool and saves on energy bills.
- Kid-Friendly: No-bake recipes are incredibly safe and fun to make with children. There are no hot surfaces to worry about, and the mixing process is highly interactive.
Nutritional Powerhouses: Breaking Down the Ingredients
What makes these Easy No-Bake Chocolate Oat Bars so fantastic is that they taste like a decadent dessert but are packed with wholesome, nutritious ingredients. Let’s look at what goes into them.
Rolled Oats (Old Fashioned Oats)
Oats are the backbone of this recipe. They provide a chewy texture and are an incredible source of complex carbohydrates and soluble fiber, specifically beta-glucan. This type of fiber is known to help lower cholesterol levels and keep you feeling full and satisfied, preventing mid-day sugar crashes.
Peanut Butter (or Almond Butter)
Nut butter acts as the primary binder for the bars while providing a massive dose of healthy fats and plant-based protein. When selecting a nut butter, look for natural varieties where the only ingredients are nuts and perhaps a touch of salt. Avoid brands with added sugars or hydrogenated oils.
Honey or Maple Syrup
Instead of relying on refined white sugar, this recipe uses natural liquid sweeteners. Honey adds a rich, floral sweetness and natural antibacterial properties, while pure maple syrup offers a distinct earthy flavor and is a great vegan alternative. Both act as the “glue” that holds the oats together.
Dark Chocolate
A layer of rich dark chocolate takes these bars from a basic snack to a luxurious treat. Dark chocolate (70% cocoa or higher) is loaded with antioxidants and flavonoids, which are linked to improved heart health and brain function.
The Ultimate Step-by-Step Recipe
Creating these bars is a simple process of melting, mixing, and chilling. Here is how to make the perfect batch every time.
Ingredients
For the Oat Base:
– 3 cups old-fashioned rolled oats (ensure they are certified gluten-free if necessary)
– 1 cup natural peanut butter (creamy or crunchy, depending on your preference)
– 1/2 cup raw honey or pure maple syrup
– 1/4 cup coconut oil (melted)
– 1 teaspoon vanilla extract
– 1/2 teaspoon flaky sea salt
For the Chocolate Topping:
– 1 cup dark chocolate chips (or chopped high-quality dark chocolate)
– 1 tablespoon coconut oil (helps the chocolate set smoothly and prevents cracking when sliced)
Instructions
Step 1: Prep the Pan
Line an 8×8 inch square baking pan with parchment paper. Leave an overhang of parchment on two sides; this creates a “sling” that makes removing the bars incredibly easy later on.
Step 2: Create the Binder
In a medium saucepan over low heat, combine the peanut butter, honey (or maple syrup), and 1/4 cup of coconut oil. Stir continuously until the mixture is completely melted, smooth, and well combined. Remove from heat and stir in the vanilla extract.
Step 3: Mix the Base
In a large mixing bowl, add the rolled oats and the sea salt. Pour the warm peanut butter mixture over the oats. Use a rubber spatula to fold everything together until all the oats are evenly coated and sticky.
Step 4: Press into Pan
Transfer the oat mixture into your prepared baking pan. Using the back of a spoon or your hands (lightly greased with coconut oil), press the mixture down firmly and evenly into the corners. Pro-tip: The harder you press the oats down, the better the bars will hold together when cut.
Step 5: The Chocolate Layer
In a microwave-safe bowl, combine the dark chocolate chips and 1 tablespoon of coconut oil. Microwave in 30-second intervals, stirring well after each interval, until the chocolate is completely melted and glossy.
Step 6: Assemble and Chill
Pour the melted chocolate evenly over the oat layer. Use a spatula to spread it all the way to the edges. Place the pan in the refrigerator for at least 2 hours, or until the chocolate is completely set and the oat base is firm.
Step 7: Slice and Serve
Once chilled, use the parchment paper sling to lift the entire block out of the pan and onto a cutting board. Using a large, sharp knife, cut into 16 squares.
Storage and Customization
How to Store
These bars are best kept cold. Store them in an airtight container in the refrigerator for up to two weeks. You can also freeze them for up to 3 months; just separate the layers with wax paper to prevent sticking.
Customization Ideas
The beauty of this recipe is its versatility. Feel free to make it your own!
– Add Crunch: Mix 1/2 cup of chopped almonds, walnuts, or pumpkin seeds into the oat base.
– Fruity Twist: Fold in 1/2 cup of dried cranberries or raisins for a chewy, tart contrast.
– Protein Boost: Add a scoop of your favorite vanilla or chocolate protein powder to the oat mixture (you may need to add an extra tablespoon of coconut oil if the mixture becomes too dry).
Conclusion
Easy No-Bake Chocolate Oat Bars prove that healthy eating doesn’t have to be complicated or boring. With just a few pantry staples and a few minutes of active prep, you can create a batch of satisfying, nutrient-dense treats that the whole family will love. Say goodbye to store-bought granola bars filled with artificial ingredients, and embrace the delicious simplicity of homemade no-bake bars today!