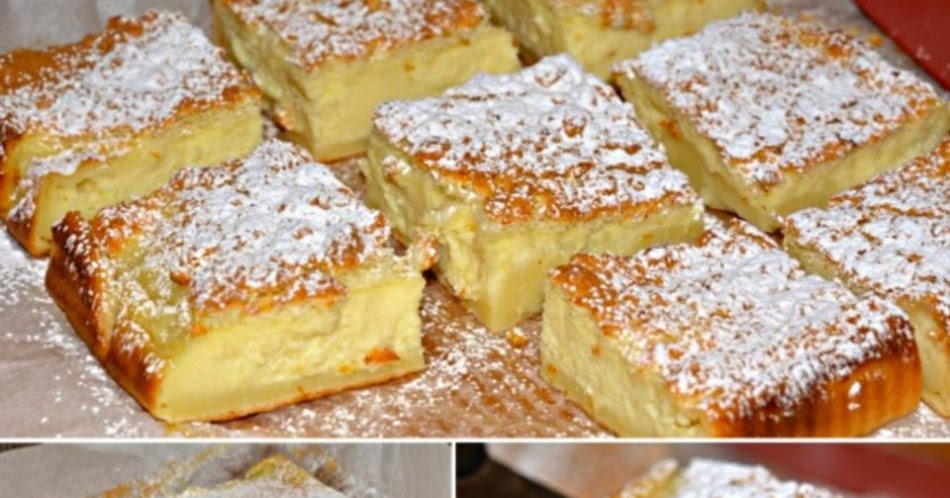
The Ultimate Magic Custard Cake: One Batter, Three Incredible Layers
Baking is often described as a science, requiring precise measurements, specific temperatures, and careful timing. But sometimes, baking feels like pure magic. This is entirely true when it comes to the Magic Custard Cake. If you’ve never experienced the wonder of this dessert, you are in for a treat. With just one simple batter, this cake miraculously separates into three distinct, delectable layers as it bakes: a dense, fudgy bottom, a soft, creamy custard center, and a light, fluffy sponge cake on top.
In this comprehensive guide, we will explore the science and the art of making the perfect Magic Custard Cake, ensuring that every time you bake it, the magic happens right before your eyes.
What is a Magic Custard Cake?
The Magic Custard Cake, sometimes simply called “Magic Cake” (gâteau magique in French), took the internet by storm several years ago and has remained a beloved classic ever since. The appeal lies in its seemingly impossible transformation.
How does one batter create three different layers? The secret lies in the specific ratio of ingredients and the technique used to combine them, as well as the baking temperature. The batter is unusually thin—much thinner than a standard cake batter—because it contains a large amount of milk.
Here’s the breakdown of the magic:
1. The Bottom Layer: This dense layer forms as the heavier ingredients (flour, egg yolks, and butter) sink to the bottom during the slow baking process. It has a texture similar to a firm flan or a dense piece of fudge.
2. The Middle Layer: This is the custard layer. The high proportion of milk and eggs sets gently in the center, creating a creamy, luscious custard that melts in your mouth.
3. The Top Layer: The light, airy top layer is the result of whipped egg whites folded into the batter at the very end. The whipped whites float to the top and bake into a delicate, golden sponge cake.
Essential Ingredients for Magic Custard Cake
To create this triple-layered masterpiece, you need very basic pantry staples. The magic doesn’t come from exotic ingredients; it comes from technique.
- Eggs (Separated): You’ll need four large eggs. The yolks provide richness and structure for the bottom layers, while the whites are whipped to create the airy top layer. Make sure they are at room temperature.
- Sugar: Granulated sugar is used to sweeten the cake and help stabilize the egg whites.
- Butter: Unsalted butter adds flavor and richness. It needs to be melted and slightly cooled before mixing.
- Vanilla Extract: A generous splash of pure vanilla extract is essential for flavoring the custard. You can also experiment with almond extract or citrus zest.
- All-Purpose Flour: Just a small amount of flour is needed to provide structure.
- Milk: The star ingredient. You need a full two cups of milk, and it must be lukewarm. Cold milk will shock the melted butter and prevent the layers from forming properly. Whole milk yields the best texture and flavor.
- Powdered Sugar: For dusting over the top of the cooled cake before serving.
Step-by-Step Instructions: Mastering the Magic
Follow these instructions carefully. The order of operations and the temperature of the ingredients are critical to achieving the three distinct layers.
Step 1: Preparation
Preheat your oven to 325°F (160°C). This relatively low temperature is crucial; if the oven is too hot, the cake will bake too quickly and the layers won’t separate.
Prepare an 8×8 inch square baking dish. Lightly grease it and line it with parchment paper, leaving an overhang on the sides. This will make it much easier to lift the delicate cake out of the pan once it’s cooled.
Step 2: Whip the Egg Whites
Separate the eggs, placing the whites in one bowl and the yolks in a larger mixing bowl. Ensure there is no trace of yolk in the whites, or they won’t whip properly.
Using an electric mixer with clean beaters, whip the egg whites until stiff peaks form. When you lift the beaters, the peaks should stand straight up without drooping. Set the whipped whites aside.
Step 3: Create the Base Batter
In the bowl with the egg yolks, add the granulated sugar. Beat them together until the mixture becomes pale yellow and slightly thickened.
Next, add the melted (and slightly cooled) butter and the vanilla extract. Beat until smooth and well combined.
Gradually add the flour to the yolk mixture, mixing on low speed until just incorporated. Do not overmix.
Step 4: Add the Warm Milk
With the mixer on low speed, slowly pour in the lukewarm milk. The batter will become very thin and watery—this is exactly how it should look! Don’t panic; this thin consistency is what allows the heavier ingredients to sink and the lighter ingredients to float.
Step 5: Fold in the Egg Whites
This is the most critical step. Gently add the stiffly whipped egg whites to the thin batter. Using a whisk or a spatula, fold the whites into the batter very gently.
Crucial Tip: Do not overmix! You do not want the egg whites to be completely incorporated. You should still see large, distinct clumps of egg white floating on top of the thin batter. This is what creates the sponge cake layer on top. If you whisk it until smooth, you will lose the top layer entirely.
Step 6: Bake the Cake
Pour the batter into the prepared baking pan. Bake in the preheated 325°F oven for 45 to 60 minutes.
Checking for doneness can be tricky. The top should be golden brown, and the edges should look set, but the center of the cake should still have a slight jiggle to it when you gently shake the pan. If the center is completely firm, the custard layer is overbaked.
Step 7: Cool and Chill
Remove the cake from the oven and let it cool completely in the pan on a wire rack. This is arguably the hardest part of the recipe—waiting! The cake must cool completely for the custard layer to set.
Once it reaches room temperature, transfer the pan to the refrigerator and chill for at least two hours (or overnight) before slicing. This chilling step firms up the layers and makes slicing much cleaner.
Step 8: Serve
Use the parchment paper overhang to carefully lift the chilled cake out of the pan. Using a sharp knife, cut the cake into squares. For the cleanest cuts, wipe the knife clean between each slice. Dust generously with powdered sugar right before serving.
Troubleshooting Common Magic Cake Issues
Even though the recipe is simple, the “magic” can sometimes fail if the technique isn’t quite right. Here are some common issues and how to fix them:
- No Top Layer (Sponge Layer Missing): This is the most common problem and happens when the egg whites are over-folded into the batter. Remember, you want big chunks of egg white floating on top when you put it in the pan.
- Cake is Too Mushy/Underbaked: If the whole cake is a sloppy custard and lacks the dense bottom layer, it was likely underbaked. Ensure your oven temperature is accurate (use an oven thermometer) and look for the golden top and slightly jiggly center.
- Layers Didn’t Separate Clearly: This can happen if the milk was cold instead of lukewarm, or if the oven temperature was too high, causing the cake to bake before the heavier ingredients had time to sink.
- Cake is Tough or Rubbery: This indicates overbaking or overmixing the flour into the yolk mixture.
Delicious Variations to Try
Once you’ve mastered the classic vanilla Magic Custard Cake, a whole world of flavor possibilities opens up. The base recipe is incredibly adaptable.
Chocolate Magic Cake
To make a chocolate version, simply substitute 1/4 cup of the flour with high-quality unsweetened cocoa powder. The process remains exactly the same, but you end up with a rich, fudgy bottom, a creamy chocolate custard center, and a light chocolate sponge on top.
Lemon Magic Cake
For a refreshing, citrusy twist, add 2-3 tablespoons of fresh lemon juice and the zest of one whole lemon to the batter when you add the vanilla extract. The lemon flavor pairs beautifully with the creamy custard texture.
Pumpkin Spice Magic Cake
Perfect for autumn, you can adapt this recipe by adding a little pumpkin puree (about 1/2 cup) to the yolk mixture, along with classic fall spices like cinnamon, nutmeg, ginger, and cloves.
Matcha Magic Cake
Matcha green tea powder gives the cake a vibrant green color and a sophisticated, slightly earthy flavor. Add 1 to 2 tablespoons of sifted culinary-grade matcha powder to the flour before mixing it into the yolks.
Why This Cake is Perfect for Entertaining
The Magic Custard Cake is an ideal dessert for hosting guests for several reasons:
- The “Wow” Factor: Slicing into this cake and revealing the three perfect layers always elicits gasps of admiration from guests. It looks like it took hours of complex pastry work to achieve.
- Make-Ahead Convenience: Because the cake requires several hours of chilling time to set properly, it is best made the day before your event. This frees up your time on the day of the party.
- Light yet Satisfying: Unlike heavy frosted cakes, the Magic Custard Cake is remarkably light and refreshing, making it the perfect end to a large, rich meal.
Conclusion
The Magic Custard Cake is a testament to the fact that you don’t need complicated ingredients or professional pastry skills to create an extraordinary dessert. With a little patience, careful attention to the temperature of your ingredients, and a gentle hand when folding the egg whites, you can conjure up this magical three-layered treat in your own kitchen. Whether you stick to the classic vanilla or venture into exciting variations like chocolate or lemon, this cake is guaranteed to impress. So, gather your ingredients, trust the process, and get ready to experience the delicious magic!